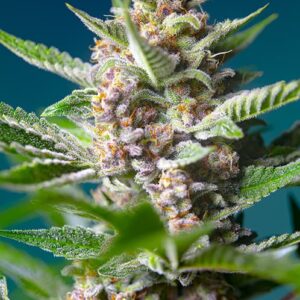


Growing your own cannabis at home may be a necessity or may be something purely hobby based. Regardless of why you are thinking about growing your own pot seeds we have some quick tips to help you reach success.
This article is going to focus on the beginning stages of life for these precious pot seeds you have just spent your hard earned money on. We want to make sure you know this information to ensure you have a successful grow.
If you have not purchased your pot seeds yet, before you do please check out our 10 Tips to Help You Buy Cannabis Seeds, which will give you some key pointers before you decide to make the jump on your first purchase of pot seeds.
Germinating your Pot Seeds:
There are many methods you can use germinating your pot seeds and every one of these methods have there pros and cons.
- Germinating in Soil – This would be the most basic method to starting seeds. Germinating directly into soils is a highly debated topic, personally we believe it’s a personal preference with what works with how you want to grow.
If you are going to start your pot seeds in soil please ensure you are
 using a seedling mix. This mix should have alot of aeration and be very low on nutrition.
Your seed should be planted approximately 1/4″ deep into your moist growing medium. If you plant into a dry growing medium then water the soil you risk sinking your seed further into the soil possibly killing your new pot seeds.
This may not be how you want to germinate your pot seeds if your are going to be growing hydroponically. While you may be using a soilless grow medium you may decide to grow with rockwool cubes or in some form of hydroton clay which will not work well if your seeds have been germinated in soil.
- Paper Towel Method – This is a fairly simple technique where you take a paper towel, gently fold up your seeds in it and you wet the paper towel just enough to be moist but not so wet that it’s dripping. You will then seal this paper towel up in an air tight container in a cool dark place.
You should check the container daily, gently unfolding the paper towel and checking the seeds to see if tap roots are showing yet. Once seeds are showing tap roots you will gently take these seeds and plant them into you desired growing medium.
Any seeds that have not shown there tap root will get gently folded back up into the paper towel and resealed in the container.
- Rapid Rooters/Jiffy Pellets – These little items are basically similar. One is already moist and may contain rooting compounds while the other is dry and needs to be moistened, it is a loose material contained by a biodegradable wrapper.
Rapid Rooters are moist soilless blocks that you stick a seed or clone into and allow the seedling to grow a healthy root zone before transplanting into its future home. These work well for seedlings going into hydroponic systems and soils.
Jiffy Pellets are little hard discs that need to be soaked in water to fully decompress and be ready to take in a young seedling. Rooting Solutions can be used during the soak of these.
Beware due to the mediums loose nature these are best for seedlings going into soil or soilless mixes. If using in systems that utilize any form of reciruclation you are asking for problems from clogged drippers and pumps to bacterial growth in your nutrient solution.
- Pre-Soaking your Pot Seeds – While soaking your pot seeds is not germinating them per se, it aids in the germination process. Pre-soaking your seeds in water allows them to soak up the needed water to trigger the germination process.
With pre-soaking pot seeds you will take a glass of water and drop your seeds into them. Once the seed has fallen to the bottom of the cup the seed is ready to be planted into its
 growing medium or placed into a paper towel for further germination.
DO NOT let you seeds sit in the glass more then 24 hours. This will deprive the seeds of oxygen and most likely kill the seeds.
- Germinating in Soil – This would be the most basic method to starting seeds. Germinating directly into soils is a highly debated topic, personally we believe it’s a personal preference with what works with how you want to grow.
Planting your Germinated Pot Seeds:
If you started germinating your seeds directly into soil or a soilless mix then you do not need to do anything until the plant is ready to be transplanted.
Assuming you started your seeds with the paper towel method you have several different ways to plant your seeds depending on how long you waited to plant your seeds after the tap root sprouted.
Lets say you waited so long that your germinating pot seeds have shed there shell and possibly even begun digging its tap root into the paper towel. You will need to carefully tear the paper towel away from the root, even leaving a little attached to the root so as not to accidentally break the tap root will be perfectly fine.
You will now need to dig a hole deep enough to plant the roots and stem while leaving the exposed leaves out of the dirt. Leave them as low to the dirt as possible for the best root development.
If your seeds are showing just a partial tap root then you will want to create a hole right around 1/4″ deep with the part of the seed the tap root is emerging from towards the sky as it will make a 180° turn and go to towards the bottom of the container if it hasn’t made this turn already.
If you are germinating your seeds in rapid rooters or jiffy pellets then wait to transplant your young plants until they have developed a nice root system extending from the medium. With the healthy root base it will ensure your pot seeds have little to no transplant shock being moved to there final growing medium.
Caring for your Seedlings:
So your pot seeds have now become seedlings. You will notice your first set of leaves are rounded and green known as cotyledon. At this point your seedling does not need any fertilization.
If you want you can add maybe 10ppm of Cal/Mg to your water which will help with root development. No other fertilization should be provided at this time.
Your lighting for your seedlings should be bright but not to intense. If you only have HID lighting ensure your lights are far enough away that you can not feel the heat from the HID lighting on your skin at the seedlings height.
Low wattage LED Lighting and/or CFL Lighting is recommended for seedlings as they are bright but have a heat output very easily managed by exhaust fans.
Once your begin seeing ribbed leaves your plants cotyledons should begin yellowing. Once you see these yellowing your nutrient regimine can begin.
Congratulations you have successfully reached the vegetation stage.
One last thing we would like to point out. Your pot seeds should take anywhere from 24 hours up to 10 days to germinate.
If your seeds are taking longer then this and you have purchased your seeds through Canna Genetics Bank please take a picture of the ungerminated seeds and send it to us so we can resolve the problem for you.
We recommend that you use whatever method of germinating your pot seeds that you feel most comfortable with.